Cookie Monster Cookies Recipe – Fun & Chewy
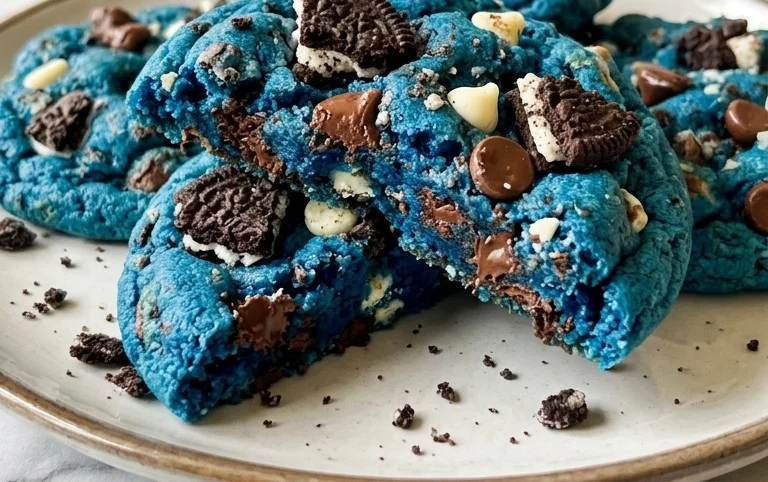
Cookie Monster Cookies are all about that intense, electric blue color, just like our favorite furry friend. They’re more than just fun to look at; they deliver a serious chocolate hit thanks to chunks of both dark and white chocolate. Add to that the satisfying crunch of crushed Oreos and whole ones tucked inside for an extra surprise, and you’ve got a cookie that’s a real treat. These are perfect for a birthday party, a fun baking session with kids, or honestly, any time you need a serious mood boost. Making them is pretty straightforward, but a few key steps make sure they come out perfectly chewy and packed with all those delicious mix-ins.

Cookie Monster Cookies
The first thing you notice about these cookies is their electric blue hue, exactly like our favorite furry, cookie-loving monster. They’re not just a visual treat; they pack a serious chocolate punch with chunks of dark and white chocolate, plus the delightful crunch of crushed Oreos and whole ones stuffed inside for an extra surprise. These are perfect for a birthday party, a fun bake with kids, or just when you need a serious dose of cookie joy. Making them is a straightforward process, but a few key steps ensure they turn out perfectly chewy and loaded with goodies.
Ingredients:
- 120 g (1/2 cup) unsalted butter, softened
- 100 g (1/2 cup) granulated sugar
- 50 g (1/4 cup) light brown sugar
- 1 large egg, room temperature
- 1 tsp vanilla extract
- Blue gel food coloring
- 230 g (1 3/4 cups) all-purpose flour
- Pinch of salt
- 1 tsp baking powder
- 1/2 tsp baking soda
- 40 g (1/4 cup) dark chocolate chips
- 40 g (1/4 cup) white chocolate chips
- 30 g (1/4 cup) crushed mini cookies
- 3 Oreos, chopped
- 12 whole Oreos, for stuffing
Making the Cookie Dough
- Cream the Butter and Sugars: In a large mixing bowl, combine the softened unsalted butter with the granulated sugar and light brown sugar. Using an electric mixer (or a sturdy whisk and some elbow grease), cream these together until the mixture is light and fluffy. This usually takes about 2-3 minutes. Creaming incorporates air into the dough, which helps the cookies spread properly and gives them a tender texture. Make sure your butter is truly softened, not melted; it should yield easily when you press it with your finger.
- Add Wet Ingredients and Color: Beat in the room-temperature egg until fully incorporated. The egg should be at room temperature so it emulsifies better with the fats, leading to a smoother dough. Stir in the vanilla extract. Now comes the fun part: adding the blue gel food coloring. Start with a few drops and mix thoroughly. Gel coloring is concentrated and gives a vibrant color without adding too much liquid to the dough. Keep adding color, mixing after each addition, until you achieve your desired Cookie Monster blue. Aim for a bright, opaque blue that reminds you of the character.
- Combine Dry Ingredients: In a separate medium bowl, whisk together the all-purpose flour, salt, baking powder, and baking soda. Whisking these dry ingredients ensures they are evenly distributed throughout the dough, which is important for consistent leavening and flavor. The salt balances the sweetness, the baking powder provides lift, and the baking soda helps with spread and browning.
- Combine Wet and Dry: Gradually add the dry ingredient mixture to the wet ingredients, mixing on low speed until just combined. Be careful not to overmix at this stage. Overmixing can develop the gluten in the flour too much, resulting in tough cookies. Scrape down the sides of the bowl as needed to ensure everything is incorporated.
- Fold in the Mix-ins: Gently fold in the dark chocolate chips, white chocolate chips, crushed mini cookies, and the chopped Oreos. These add texture and delicious pockets of flavor throughout the cookie. Make sure these additions are distributed evenly. The crushed mini cookies and chopped Oreos add a lovely crumble and extra cookie flavor that complements the main dough.
Assembling and Baking
- Prepare for Stuffing: Now it’s time to stuff these cookies with whole Oreos. Take about 2 tablespoons of the blue cookie dough and flatten it into a disc in your palm. Place one whole Oreo in the center of the disc. Carefully wrap the dough around the Oreo, ensuring it’s completely enclosed. You want to make sure there are no gaps where the Oreo might peek through during baking. Repeat this for all 12 whole Oreos.
- Form the Cookie Balls: Once you have your stuffed dough balls, gently roll each one into a smooth ball. Place these balls onto a baking sheet lined with parchment paper, leaving about 2 inches of space between each cookie. This allows for spreading. For larger, more impressive cookies, you can use a slightly larger scoop of dough. If you want them to spread more, you can gently press down on the top of each dough ball with your palm or the bottom of a glass.
- Bake to Perfection: Bake in a preheated oven at 350°F (175°C) for 10-12 minutes. The cookies should look slightly puffed and the edges should be set, but the centers might still appear a little soft. They will continue to cook and firm up as they cool on the baking sheet. Overbaking will result in dry, hard cookies. Keep an eye on them during the last few minutes of baking.
- Cool and Enjoy: Let the cookies cool on the baking sheet for 5-10 minutes before transferring them to a wire rack to cool completely. This step is important for allowing the cookies to set properly. If you try to move them too soon, they might fall apart. These cookies are best enjoyed at room temperature, when the chocolate is still slightly gooey and the cookie has a perfect chewy texture. You can store any leftovers in an airtight container at room temperature for up to 3-4 days.
Conclusion:
These Cookie Monster Cookies bring pure joy to any occasion. The combination of chewy cookie, creamy chocolate chunks, and crunchy Oreo pieces makes every bite exciting. They’re a fantastic way to brighten someone’s day or simply treat yourself. Don’t be afraid to get creative with the mix-ins; feel free to add sprinkles or other candies you love.
For serving, they are best enjoyed slightly warm with a glass of cold milk. You can also pack them for lunches or share them at bake sales. They hold up well for a few days, making them convenient to have on hand.
Think about adding M&Ms for extra color or even some mini chocolate chips if you want smaller pockets of chocolate. If you don’t have blue food coloring, you can always make a regular chocolate chip cookie and still get that amazing flavor. The key is the generous amount of chocolate and cookies!
Frequently Asked Questions:
How do I get the color really blue?
Use gel food coloring for the most intense color. Start with a few drops and add more until you reach your desired shade of blue. Gel colors are more concentrated than liquid ones, so you won’t need much, and they won’t thin out your dough.
Can I make these ahead of time?
Yes, you can definitely make the dough ahead. Wrap it tightly in plastic wrap and keep it in the refrigerator for up to 3 days. You can also freeze the dough balls for up to 3 months. Just bake them straight from frozen, adding a few extra minutes to the baking time.
Why are my cookies flat?
Flat cookies often happen when the butter is too soft or melted, or if you overmix the dough after adding the flour. Make sure your butter is softened, not melted, and cream it well with the sugars. Also, avoid overmixing once the dry ingredients are in.
Cookie Monster Cookies
Fun and colorful blue cookies filled with chocolate chips and crushed Oreos, inspired by the beloved Cookie Monster.
Ingredients
-
120 g (1/2 cup) butter – unsalted, softened
-
100 g (1/2 cup) granulated sugar
-
50 g (1/4 cup) light brown sugar
-
1 egg – room temp
-
1 tsp vanilla extract
-
Blue gel food coloring
-
230 g (1 3/4 cups) all-purpose flour
-
Pinch of salt
-
1 tsp baking powder
-
1/2 tsp baking soda
-
40 g (1/4 cup) dark chocolate chips
-
40 g (1/4 cup) white chocolate chips
-
30 g (1/4 cup) crushed mini cookies
-
3 Oreos, chopped
-
12 whole Oreos for stuffing
Instructions
-
Step 1
Cream together the softened butter, granulated sugar, and light brown sugar until light and fluffy. -
Step 2
Beat in the egg and vanilla extract until well combined. Add blue gel food coloring until desired color is achieved. -
Step 3
In a separate bowl, whisk together the flour, salt, baking powder, and baking soda. -
Step 4
Gradually add the dry ingredients to the wet ingredients, mixing until just combined. Stir in the dark chocolate chips, white chocolate chips, crushed mini cookies, and chopped Oreos. -
Step 5
Chill the dough for at least 30 minutes. Preheat oven to 350°F (175°C). Line baking sheets with parchment paper. -
Step 6
Scoop about 2 tablespoons of dough, flatten it, place a whole Oreo in the center, and then wrap the dough around the Oreo to enclose it. Roll into a ball. -
Step 7
Place cookies on the prepared baking sheets, leaving about 2 inches between them. Bake for 10-12 minutes, or until the edges are lightly golden and the centers are still slightly soft. -
Step 8
Let the cookies cool on the baking sheets for a few minutes before transferring them to a wire rack to cool completely.
Important Information
Nutrition Facts (Per Serving)
It is important to consider this information as approximate and not to use it as definitive health advice.
Allergy Information
Please check ingredients for potential allergens and consult a health professional if in doubt.